
The Ultimate WordPress Playbook: Mastering the Art of Crafting and Refining Blog Posts

Harnessing the Power of Email: Strategies for Growing Your Email List
June 15, 2023
Mastering the MailChimp-WordPress Integration for Effective Email Marketing
June 30, 2023
Section 1: Introduction: The Word on WordPress
With the digital era fully bloomed, WordPress has become the go-to platform for bloggers and businesses alike. It’s known for its ease of use and vast customization options. However, it can seem a little daunting to those just getting started, especially when it comes to creating and editing blog posts. Fear not! This comprehensive guide will walk you through each step, making sure that you’re more than equipped to hit ‘publish’ with confidence.
As the first section of this post, we aim to reassure you that adding or editing pages on WordPress is as easy as pie. All you need is a few clicks and a bit of creativity, and you’ll be crafting engaging blog posts in no time.
Section 2: Getting Started: Creating Your WordPress Masterpiece
Creating a page or blog post on WordPress is like crafting a masterpiece – it’s a creative process that involves various stages. First off, locate the ‘Pages’ menu on your WordPress Dashboard and select ‘Add New’. This will lead you to the WordPress Block Editor, a place where you can visualize your page and make adjustments as you see fit.
The block editor is your canvas; it’s here that you’ll add and arrange your blocks. Blocks can represent anything from a simple paragraph to videos or images. Each block comes with its unique set of controls to alter alignment, width, color, and more.

Section 3: Giving Your Page a Personality: Choosing the Title and Content
Now that you’re familiar with your canvas, it’s time to create. First, add your page title. Make sure it’s descriptive and informative, reflecting the content that the page will host.
Then, move on to the content itself. This can encompass anything – headings, lists, tables, images, videos, text, and more. With the diverse array of blocks like Paragraph, Image, Headings, List, Gallery, Quote, Cover, File, Audio, and Video at your disposal, the sky’s the limit for what your page can host.

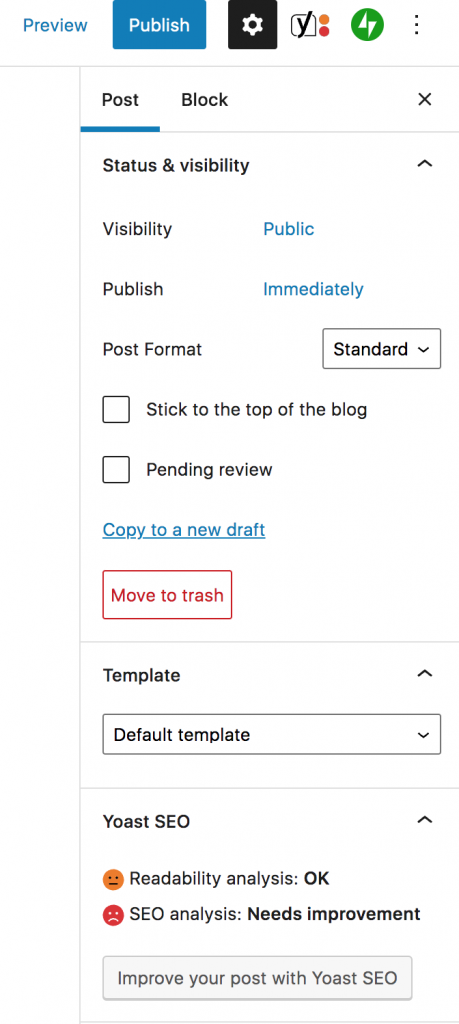
Section 4: The Finer Details: Utilizing Document Settings
Document settings are your key to customizing the visibility and the dynamics of your page. Found on the right-hand side of the WordPress page editor, here, you can determine how your page will be viewed by the public.
You have three visibility options – Public (accessible to everyone), Private (accessible to only editors and site admins), and Password Protected (accessible to only users with a unique password). You can also schedule when to publish your WordPress page, giving you full control over your content and its timeline.
Section 5: The Cherry on Top: Adding Extra Features to Your Page
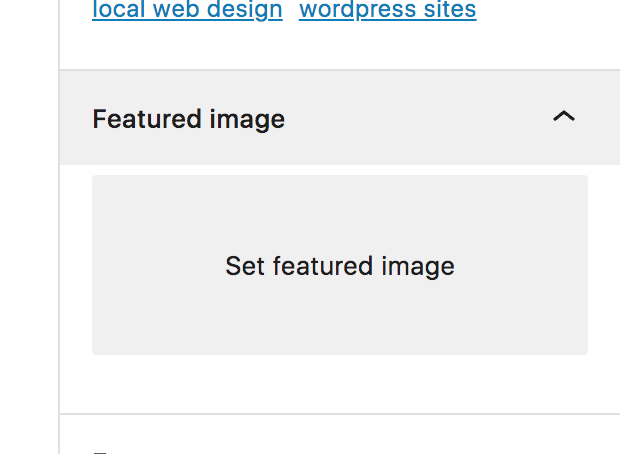
Adding extra elements like a featured image, discussion comments, and permalink can enrich your page’s engagement and ease of accessibility. Featured images not only make your page aesthetically appealing but also serve as a preview image on social media platforms when you share your blog post.
Enabling or disabling comments can help you control the discourse on your page. Your page’s permalink or slug is crucial for SEO and should reflect the title or main theme of your page. Also, you can assign parent pages and templates to your page using the ‘Page Attributes’ section.
Section 6: Sneak Peek and Save: Previewing and Saving Your Page as a Draft
Before you unveil your masterpiece to the world, it’s always wise to take a sneak peek. The preview option allows you to see how your page will look when published, ensuring that all elements are in harmony. If you feel it needs more work, you can save it as a draft and return to it later.

Section 7: The Final Act: Publishing Your WordPress Page
Now comes the most satisfying part of the process – hitting the ‘Publish’ button. Once you’re content with your work, press ‘Publish’ to make your page go live. You’ll receive a confirmation with the page address, which you can save for future reference.
Section 8: Recreate and Refine: How to Edit Your WordPress Page
Creating a page is only half the fun; editing it as your content evolves is equally important. To edit an existing page, navigate to your WordPress Admin Area and select ‘Pages’ from the dashboard. Here you can choose the page you want to edit and use the WordPress editor to make the necessary changes.
Whether you want to change the text, add media, or tweak the layout, the options are endless. Just remember to hit ‘Publish’ once you’re done to make your edits go live.
Section 9: Wrapping Up: Embracing Your New WordPress Skills
And there you have it – a step-by-step guide on how to create and edit pages on a WordPress website. With these tools at your disposal, you’re well on your way to becoming a WordPress wizard. Be adventurous with your content and remember, you can always edit your pages to reflect your evolving ideas or add new pages to expand your content.
